- What is Risography (Riso)?
- The Problem
- The Tutorial
- Core Concepts
- Before You Start
- Summary
- Step One: Create your preview space
- Step Two: Create your spot colours
- Step Three: Clone & move spot colours
- Step Four: Group colours
- Step Five: Clone & move colour groups
- Step Six: Invert lightness
- Step Seven: Create mask
- Step Eight: Set objects to multiply
- Finally: Clean up & usability
- Troubleshooting
- The End
What is Risography (Riso)?
Risograph is a brand of printers created by the Riso Kagaku Corporation. Risography, the printing process that this brand of printers uses, is very similar to screenprinting (or, perhaps more accurately, mimeography). When you send your file to the printer, the printer will create a rice paper stencil based on your design by cutting and discarding areas of the paper. This stencil is then affixed to an ink drum. As your printed matter passes through the printer, ink will be applied to your printed matter through the holes made in the stencil. Unless your printer is especially fancy, multi-colour prints are achieved by sending multiple files to the printer and running the same printed matter through the printer multiple times against different stencils. Similar to screenprinting, although the screen itself is binary “lighter” shades of the ink can be convincingly approximated by creating many small dots in the screen called halftones (a process generally applied by the printing software, not the designer).
Riso machines allow you to print many copies of a design at a very low price per copy. The translucent, vegetable-oil inks come in colours outside the CMYK and RGB colour gamuts, which allows you to create prints that are impossible to make on a standard inkjet/laser printer and impossible to accurately preview on a standard LCD monitor.
The Problem
RISO machines accept grayscale PDF files and output colourful pieces of paper. While designing your print, it can be really difficult to conceptualize how the final product will look.
I tend to make text-heavy agitprop that’s designed start-to-finish for RISO printing. I use my one true love, vector graphics program Inkscape, to do this. I organize my artwork into one layer per colour then when I’m ready to print I export one layer at a time to send them to the RISO machine. Although many RISO inks are not visible on the RGB gamut that my LCD monitor supports, they do have hex analogues that I can use to get a good enough sense of what the final product might look like. However here we have a problem: I can represent my objects in colour so that I can see what I’m doing as I align my multi-colour text (then manually and error-pronely convert them to grayscale before printing), or I can look at the mess of black that the printer wants to see. No one has been able to tell me how I might be able to do both.
wesleyac articulates the desire well in their MetaFilter question:
I want to be able to [t]ake N different greyscale PDFs or images, and preview what they will look like printed with different colors. I understand that this will always be a little inaccurate, I’m just hoping for something better than using my imagination to check that I got alignment/etc right.
Some technological tools do already exist in response to these desires. Spectrolite, for example, is a MacOS-exclusive app that will take a fine art image and decompose it into colour-separated component parts. However if I’m just trying to check the alignment of two textboxes, tracking down a usable mac and booting up Spectrolite just to tweak the colour of a pdf textarea a bit overkill.1
axlevxa’s Riso Instant Proofer is more what I’m looking for. RIP is a vanilla web-app that accepts grayscale JPGs and PNGs, a palette of RISO colours, and prettily applies them on a canvas element. This is profoundly useful, but still an achingly long feedback loop. My initial problem-solving plan was to… periodically export my Inkscape document as multiple PNGs, whereupon a script watching my output directory will ferry those files to a local copy of RIP for preview? Though I guess if I’m going to the trouble of writing a script already it should ideally be able to watch my Inkscape SVG directly and convert it on my behalf? And why does it feel like I’m rewriting Inkscape at this point… shouldn’t my image editor be able to… show me an edit of my image?
It should. It really should. “[G]oogle ‘screenprinting color separations GIMP’ to see if you can find a tutorial on it. Screenprinting file prep is a very similar process and less obscure than riso” said 100kb in response to wesleyac’s MetaFilter question. Unfortunately, I duckduckgo’d my heart out and I genuinely couldn’t find anything that I could make use of.2
In response to the same question, MF user Zalzidrax implied the existence of a method for print previewing directly within an image editor, and their reply is ultimately what inspired the following process. Said process took me hours and hours to perfect, because I am not actually very good at using Inkscape. I am Inkscape Inept, you might say.
So, while I feel a bit silly for creating such an involved tutorial (especially as someone who was (…with significant effort) able to figure it out myself) I am guessing that many of my fellow internet users are similarly inept, so here is the Inkscape tutorial that I wish I’d been able to find. (And the Inkscape tutorial that I return to many times to remind myself what I did, because I forget.)
The Tutorial
If you prefer moving pictures, a video companion to this tutorial has been made available on makertube.net. The video companion is missing a lot of the editorializing & rationale of the text tutorial, so I would recommend reading this post in its entirety first, or referring to both at once.
Core Concepts
You can safely skip this section of the tutorial if you’d like, but building an understanding each step of the process will help you troubleshoot issues that occur when you inevitably fail to perfectly complete the complex steps of this tutorial. Here is a short summary of our goals, needs, and tools:
- RISO machines need grayscale PDFs, one pdf per ink colour. #000 (black) areas of the PDF will result in full colour (i.e. full image opacity), and #fff (white) areas of the PDF will result in no colour (i.e. full image transparency).
- It is generally best practice to separate one’s working document into layers with one colour per layer, then export a single layer at once.
- While RISO inks often cannot be accurately represented on LCD screens, RISO inks do have approximate hex codes. If you aren’t sure what the hex analogue for your inks are, you can grab them from stencils.wiki.
- In Inkscape, a “mask” is an operation that can be applied to two objects. The first object in the mask acts as a cookie cutter for the second object of the mask. Inkscape uses the first object’s lightness to decide how much of the second object to reveal. #fff (white) areas of the first object will result in full visibility of the second object (i.e. full image opacity), and #000 (black) areas of the first object will result in no visibility of the second object (i.e. full image transparency).
- In Inkscape, a “clone” is an operation that can be applied to one object to create a second, identical object. Many modifications to the original object will be propagated to that object’s clone.
You will also need basic Inkscape skills such as moving around the canvas, creating layers and groups, moving objects, and creating rectangles. If you have literally never used an image editing program in your life you may want to check out this basic Inkscape tutorial, where you will learn the first three skills, and the first part of this Inkscape tutorial on rectangles where you will learn how to create a rectangle.
Hopefully you can see where I’m going with this, but if not please come along anyway. :)
Before you start
Please make sure you have:
- hex codes for the RISO inks you are using
- the size of your canvas
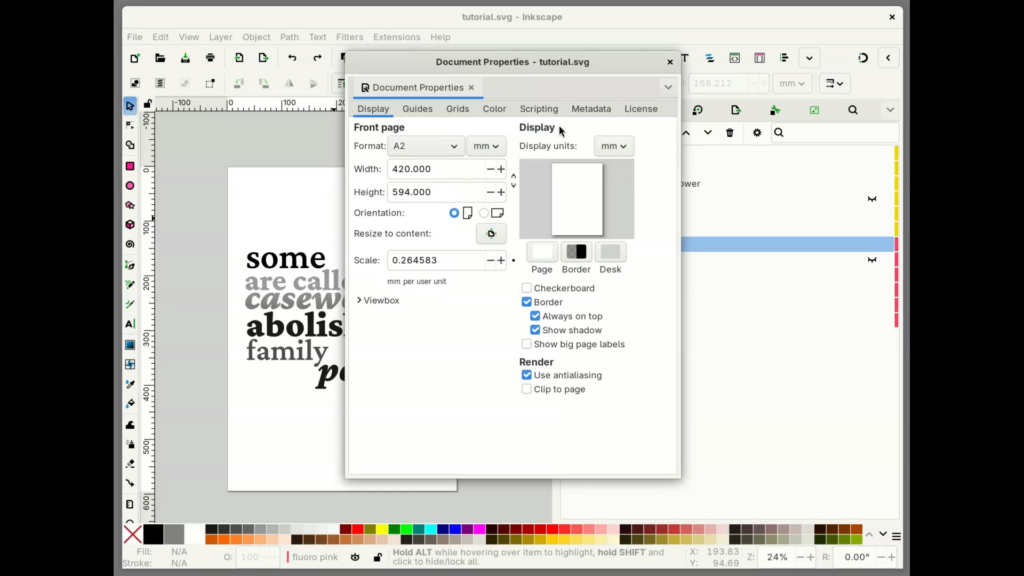
Unless you want to do extra math, I’d also recommend ensuring that the document display units are the same units as the size of your canvas. For example, if you conceive of your document as being 420mm x 594mm (A2 size), then ensure that the rulers and number inputs are also measured in millimeters. You can check/change the document size and display units from the menu bar via File > Document Properties > Display, also accessible via shift + ctrl + d. If you prefer to work in pt/px/etc you can revert this setting once the print preview setup is complete, or calculate the size of your canvas in the display unit of your choice.
Summary
Here’s a general overview of the steps. If you’ve never followed this tutorial before, please don’t let this information overwhelm you.
- Create a big rectangle (the size of your canvas) wherever your preview area is going to be
- Create big rectangles (the size of your canvas) in the colour of your RISO inks
- Make a clone of each spot colour and move that clone into the preview area
- Make sure that all items of each colour are in a group, in addition to being on their own layer
- Make a clone of each colour group and move that clone into the preview area
- Apply the “colour > invert” filter to each cloned colour group (“invert lightness”)
- Create a mask of the inverted colour group over the cloned spot colour
- Set the final object to “multiply”
Some of these steps have terrible foot-guns. Skip steps at your own risk.
Step One: Create your preview space
First, you need to dedicate a space for viewing your print preview. You could of course put the print preview right on top of everything else, but I like to put it off to the side for two very important reasons: 1) I like being able to see the print preview while I edit, for immediate feedback. This is, of course, the main point of this tutorial, for me. :) 2) There is always a possibility that your print preview could accidentally be exported alongside your actual drawing. Putting your print preview outside the bounds of the page can reduce the likelihood that accidents like these to occur, because when exporting the “page” everything outside the bounds of the page will be excluded.
Use the rectangle tool to create a rectangle the same size as your page/canvas. The easiest way to do this is usually to select the rectangle tool (either click on the rectangle in the toolbox or press “r”), click and drag your mouse on the canvas to make a small rectangle, then enter the exact size in the “W:” (width) and “H:” (height) inputs in the toolbar. Make sure that this rectangle is the same colour as whatever the background colour of your printed matter will be (usually white, but if you’re using coloured paper you might want to change it for the best preview possible).
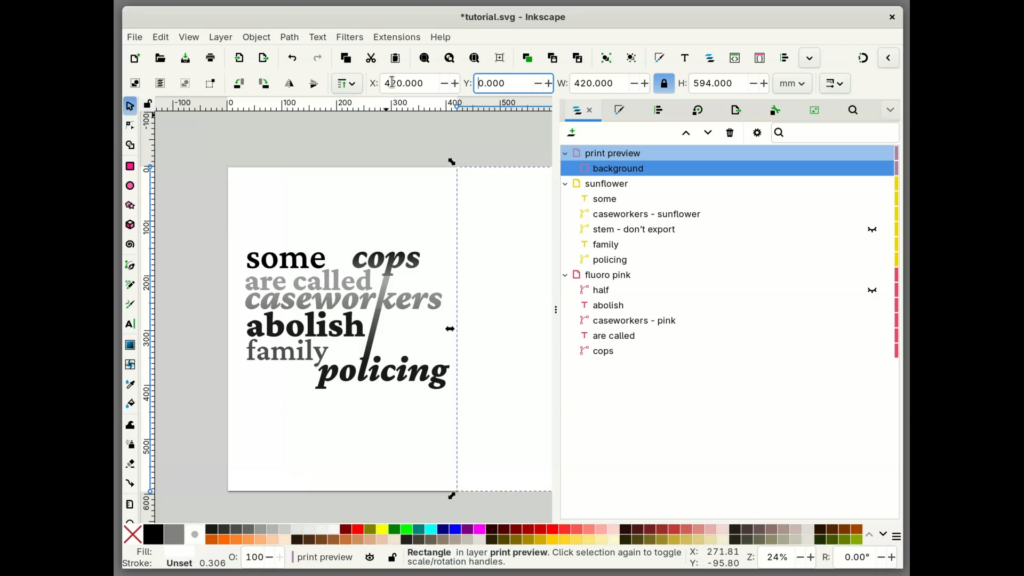
Next, move this rectangle to wherever you want your print preview to be. For this example I am going to put my print preview directly to the right of my document. The easiest way to do this is to select the rectangle object, then switch to the selector tool (either click on the mouse in the toolbox or press “s”) and manually enter the X and Y coordinates of where you want your rectangle to be.
In most graphical settings, (0,0) is the upper lefthand corner of the document. (You may have memories of usually focusing on “quadrant I” in middle school math, where (0,0) was always in the lower lefthand corner of the document. idk why it is, but in graphical settings the document occupies quadrant IV of the coordinate plane.)
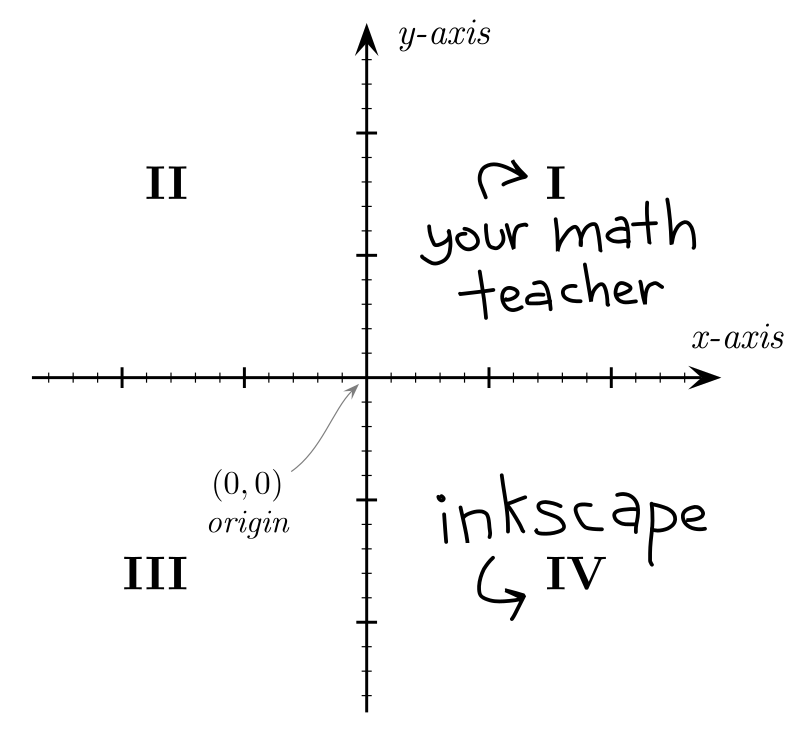
Thus, Y will be 0 and X will be 0 + the width of your document. In this example my document was 420mm by 594mm, so I set the X coordinate of my rectangle as 420mm.
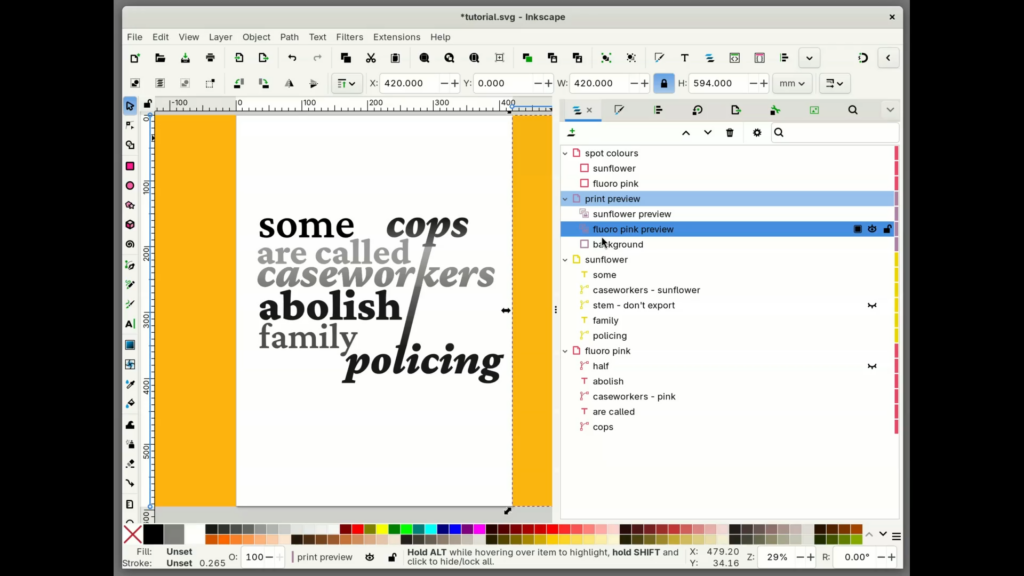
Finally, when organizing all of my objects and layers, I like to call this rectangle “background”. It should be the lowest item in your “print preview” layer.
Step Two: Create your spot colours
Now you’ll do almost exactly what you just did, but the rectangles will be the same colour as your RISO inks.
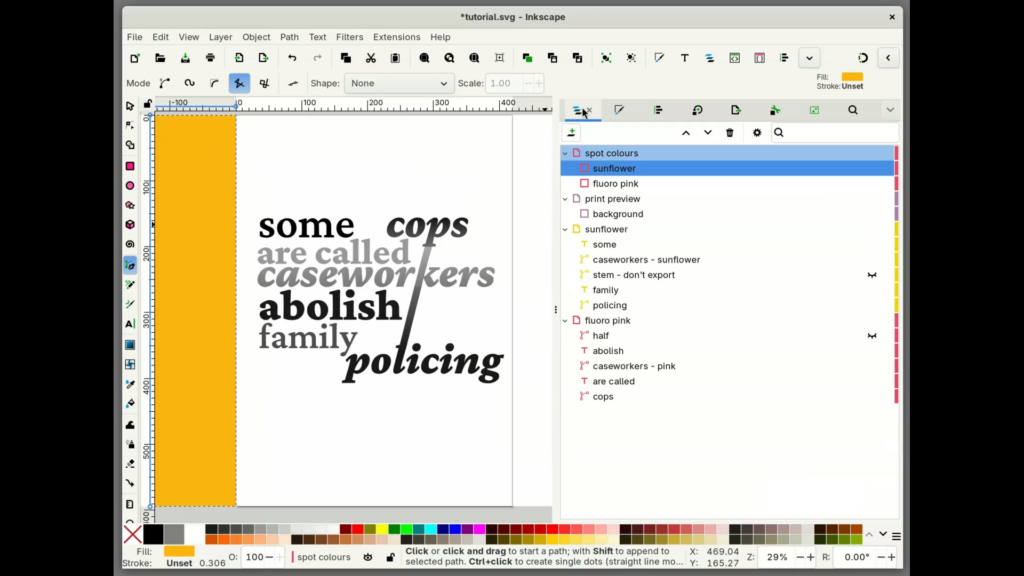
Follow the process from step one to create as many rectangles as you have RISO inks. Again make each rectangle the same size as your canvas. In this example I am printing a bi-colour print using Sunflower and Fluorescent Pink, so I made one rectangle named “sunflower spot” and one named “fluoro pink spot”.
Unlike in step one, move these to a secret third place away from both your canvas and your preview area. When I put the preview area on the right, usually I put my spot colours on the left. This aspect of the setup is optional (you could instead skip the next step by moving them directly to the preview area) but this step will allow you to adjust or change your spot colours later, in case you want to swap one colour for another or if you hear new advice about which hex code might best approximate the RISO ink.
When organizing all of my objects and layers, I like to put these in a separate layer called “spot colours”.
Step Three: Clone & move spot colours
Next, make a clone of each of your spot colours (right click on them in the “Layers and Objects” view, then click “clone”, or press “alt/option + D” with the object selected) and move the clones to your preview area. Again, the best way to do this will be to manually enter the X and Y coordinates of where you want your rectangle to end up. These should be identical to the coordinates in step one (e.g. X = 0 + the width of your document, Y = 0, if your preview area is on the righthand side).
Unlike the spot colours you made in step two, these clones will become an integral visual component of the print preview, so I put them in the “print preview” layer right above the background.
Step Four: Group Colours
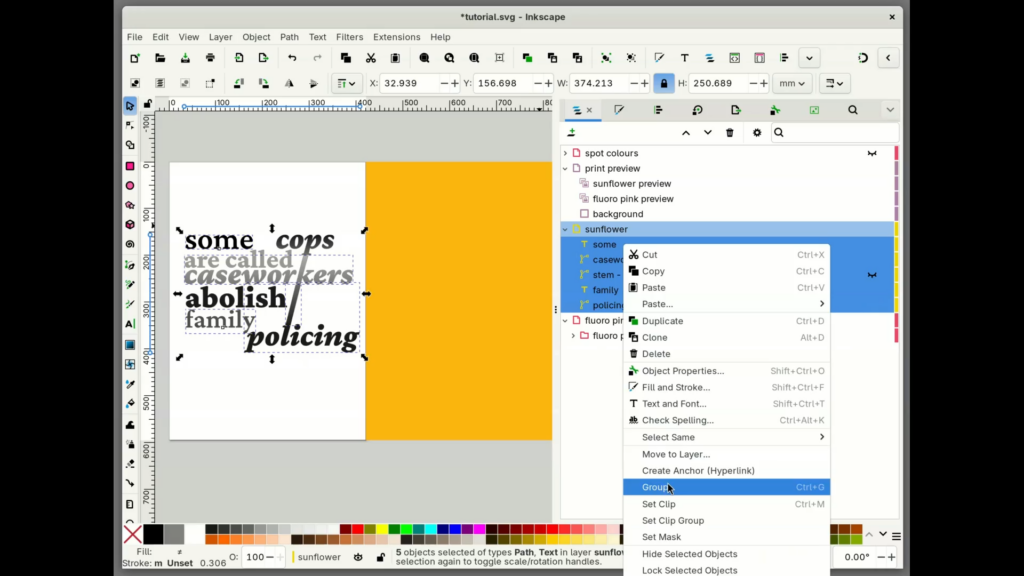
Now for the design itself. You will eventually clone your design and move it to your print preview area, but before you do this there are two very important things that you must do: 1) each colour must be grouped 2) each colour group must have AT LEAST two objects in its group
Creating a group will allow new objects added to your canvas to automatically show up in your print preview and will allow the objects in your print preview to follow their original’s movements. However, said movements will not propagate unless you have at least two objects in the group (presumably they need to move relative to at least one other object in the group in order for relative moves to propagate). If your design does not currently have at least two objects per RISO colour, you can add a white element or some sort of work-in-progress placeholder.
To create a group, select all elements of the same colour in the “Layers and Objects” view, then press ctrl+g (or right-click then press “group”). If you miss a few objects the first time, then drag and drop any missed items into the group.
Step Five: Clone & move colour groups
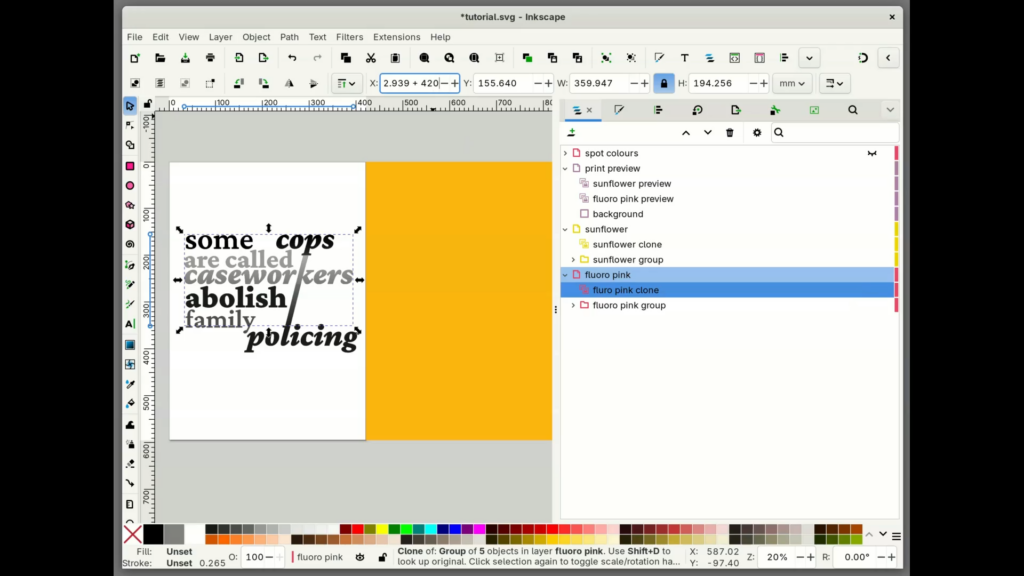
Now, clone the group of colours that you just made. Each group should turn into a single object (generally called “use”) and you should no longer be able to dig into the objects within the group.
Next, move these clones into your preview area, just as you have been doing with the rectangles. Because your grouped objects likely don’t run to the very edge of the page, their X and Y coordinates may not be (0,0). It is critical that you move the group by adding or subtracting values from their X and Y coordinates in the toolbar. In this example my Fluoro Pink group clone was at 32.939mm, 155.640mm. I moved the group clone into the preview area by adding 420mm to the X coordinate. Inkscape will calculate this value for you if you type the equation verbatim, then press enter.
Position each group directly above its component cloned spot colour in the “print preview” layer. In this example, “sunflower clone” goes directly above “sunflower preview” and “fluoro pink clone” goes directly above “fluoro pink preview”.
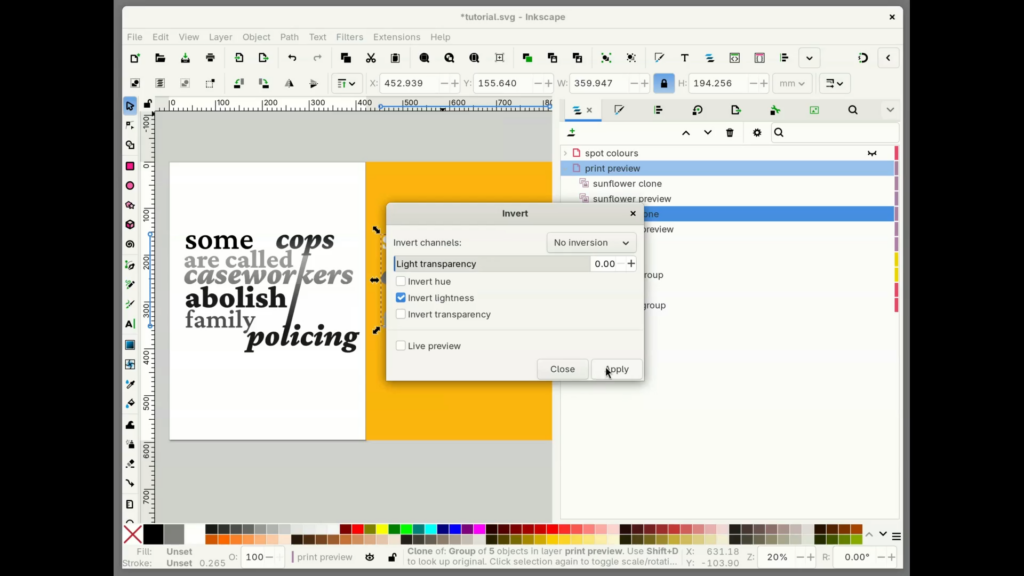
Step Six: Invert lightness
The final step before setting the mask is to invert the lightness of all objects in the group. With the group selected, select “Filters > Color > Invert…” from the menu bar.
The resulting inversion filter has more options that we strictly need. Set “invert channels” to “No inversion”, set “Light transparency” to 0, and uncheck the “Invert hue” and “Invert transparency” boxes. The only selected box should be the “Invert lightness” box. If you’d like, you can check the “Live preview” box to see what will happen when you press “Apply”.
Pressing “apply” should turn black parts of your design to white, and white parts of your design to black. Do it, do it now.
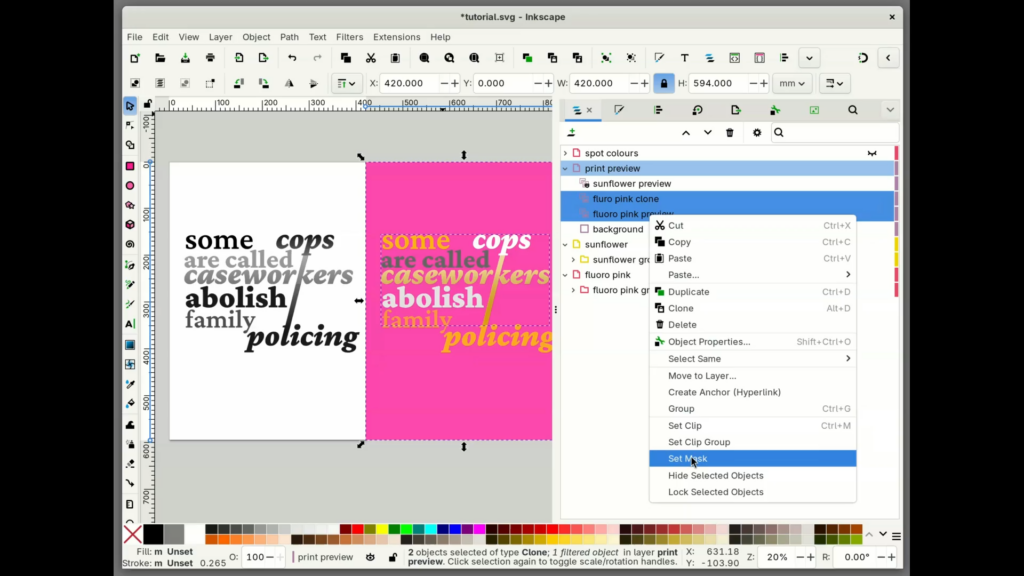
Step Seven: Create Mask
The penultimate and most essential step is to combine each inverted, cloned design with the colour that it corresponds to. Select a design and its colour (the latter should be positioned right below it), then select “set mask” from the right-click menu.
If everything has worked correctly, you should see a preview of what that pass of the RISO machine will print!!!
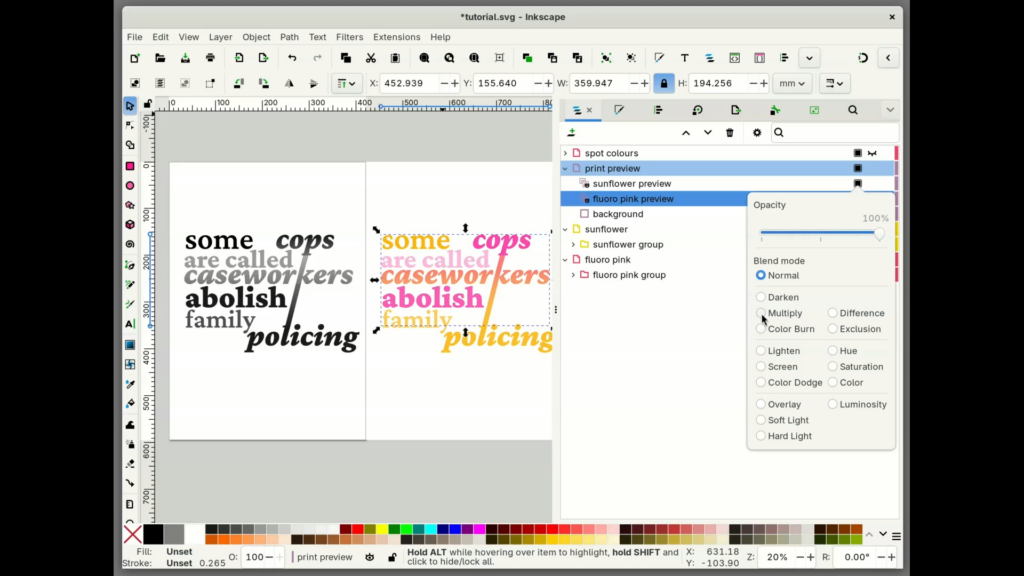
Step Eight: Set Objects to Multiply
Finally, as mentioned by limnerent in the MF post, you may be able to get an even more accurate print preview by setting the object’s blend modes to “multiply”, to mimic the translucency of the RISO inks. An object’s blend mode is available on hover in the “Layers and Objects” menu by clicking the inscribed square that shows up there.
Finally: Clean-up & Usability
You should now have a working print preview that will automatically track all changes to your final design! Congratulations.
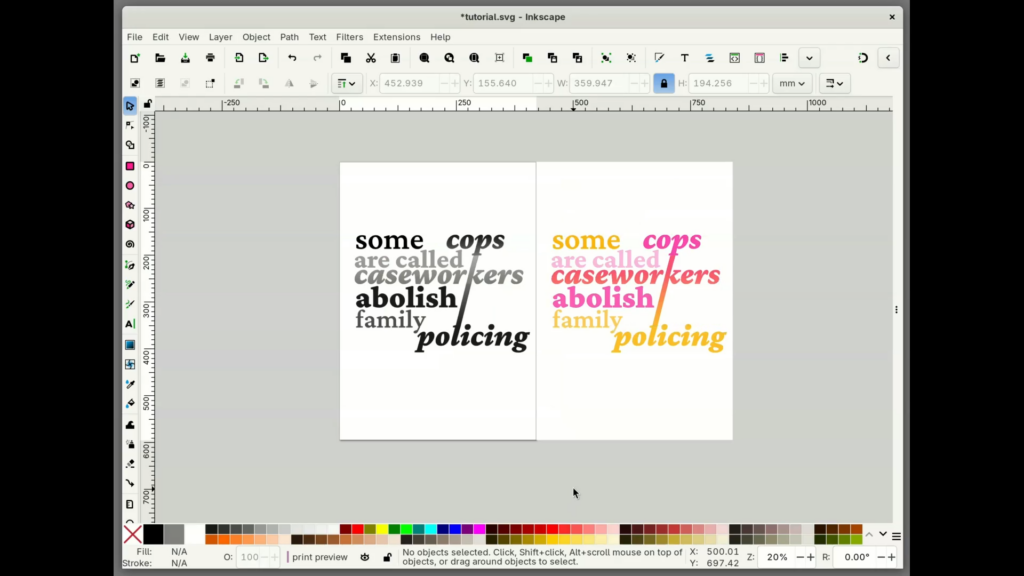
Any new objects added to your colour groups will automatically be included in the cloned group, so please feel free to make serious changes to your design with the help of the print preview. :)
If you have never worked much with Inkscape groups before, you may notice that clicking and dragging an object to move it no longer works very well. Much of the time you may select and move the entire group by accident, a move that will not get mirrored on the print preview. To select and move a grouped item this way, as you may recall from the basic Inkscape tutorial linked above, you can click on your object while holding down “ctrl”, then release “ctrl” and move the object as normal. You might also consider finding that object in the “Layers & Objects” view, then editing that object without the mouse, or removing an object from the group in order to interact with it freely, then adding it back to the group whenever you’d like the print preview to be accurate again.
If for some reason you still do not have a functional print preview, or if you have made a change that seems to have broken something, then you may have A Problem (something that is very easy to encounter in a process with so many fiddly sequential steps). If you do have A Problem, please do not suffer needlessly. Instead, consult the following troubleshooting table (compiled courtesy of my own, copious mistakes).
Troubleshooting
not following movement
Sometimes you may move an object on your canvas and the corresponding object on the print preview will not move.
Diagnosis: This can happen when you do not have 2+ items in your colour group. In order for the cloned group to track your moves, you have to have at least one other object in the group. You also must move that object relative to another object in the group, instead of moving the broader group itself.
Differential diagnosis: unfurl the items in your colour group. If there is only one top-level item, then this is your issue. Note that sub-items (like a text with multiple children) do not count.
Fix: you will need to add a new item to your colour group. :)
“not showing up”
Sometimes after applying the mask in step seven nothing will show up in the print preview area, even though you have multiple 100% fill objects on your canvas.
Diagnosis 1: did you remember to apply the inversion filter to the cloned group before you applied the mask? #000, uninverted, will result in a fully transparent mask.
Differential diagnosis: this issue is most likely to go unnoticed on designs that only have 100% fill objects. Mess with the lightness of the objects on your canvas. If turning a black object grey renders it visible, then you have forgotten to apply the inversion filter.
Fix: release the mask, apply the inversion to the cloned group, then re-apply the mask.
Diagnosis 2: did you remember to move the cloned spot colour swatch into the preview area? If the colour swatch does not cover the preview area, then the mask won’t pick up anything.
Differential diagnosis: inspect your mask using the selection tool and look at the X and Y coordinates. Do those coordinates match the coordinates of the background of your print preview area?
Fix: it may be tempting to simply move the mask to the correct place, but that will move the cloned colour group and the cloned colour swatch at the same time, so they’ll still be offset. Release the mask, move the cloned colour swatch to the correct place (and ensure that the cloned group is in the correct place!) then re-apply the mask.
Diagnosis 3: did you make the original spot colour swatches invisible? If you’d like to hide the original spot colours you can do so by adjusting the visibility of a parent object (e.g. the “spot colours” layer). If you mark the rectangles themselves as invisible then that property will propagate to the masked clone.
Differential diagnosis: inspect your swatch colours in the “Layers & Objects” view and note whether they’re marked as visible or not
Fix: make your swatch colours visible.
not following grayscale
Finally, it may be the case that everything seems to work, but editing the lightness of objects on your canvas does not change the lightness of objects in the print preview.
Diagnosis: you may have applied a “clipping” rather than a “mask”. A clipping works very similarly to a mask (and is right next to it in the dropdown) so this is an easy mistake to make; a clipping will not respond to the lightness of the top object though, you’ll need to use a mask.
Differential diagnosis: inspect your mask in the “Layers & Objects” view. If it is marked with a scissors icon, and if right clicking on the object provides an option to “Release Clip”, then you have indeed accidentally applied a clip.
Fix: release the clipping, then re-apply it as a mask.
The end
Devising this process and writing this tutorial took a large amount of work, but both the print preview process and its documentation have been invaluable to me in creating weird things with riso. I hope that you find it useful. <3
- Axel Berggraf Egenæs’s Riso Separator is similar, if fewer featured, and can operate in a web browser, but like Spectrolite and RIP still don’t really achieve what I’m going for. ↩
- but a big shoutout to this presentation from Libre Graphics Club, which I felt certain would address this problem before the presenter waived this process off as trivial at the last moment lolll ↩